Thursday, January 24, 2013

Peace Quilt Bloggy Party and a Giveaway


I am so excited to participate in the Peace Quilt Bloggy Party and be able to share my Peace Quilt and Peace top. I have been a follower of Rene' for over 40 years ;-) For those who may not be familiar with us, Rene' is my sister, best friend, motivator, source of inspiration...yes, I think she is awesome. And her Peace Quilt Pattern is just as awesome.


I totally fell in love with her first Peace Quilt, Feeling Groovy. If you haven't seen it, it is SO worth following the link!!

After some begging and pleading gentle persuading (thanks KT), Rene' developed the pattern, which is now available for purchase.

I had the pleasure of testing the pattern and am so happy to share a little #peace.

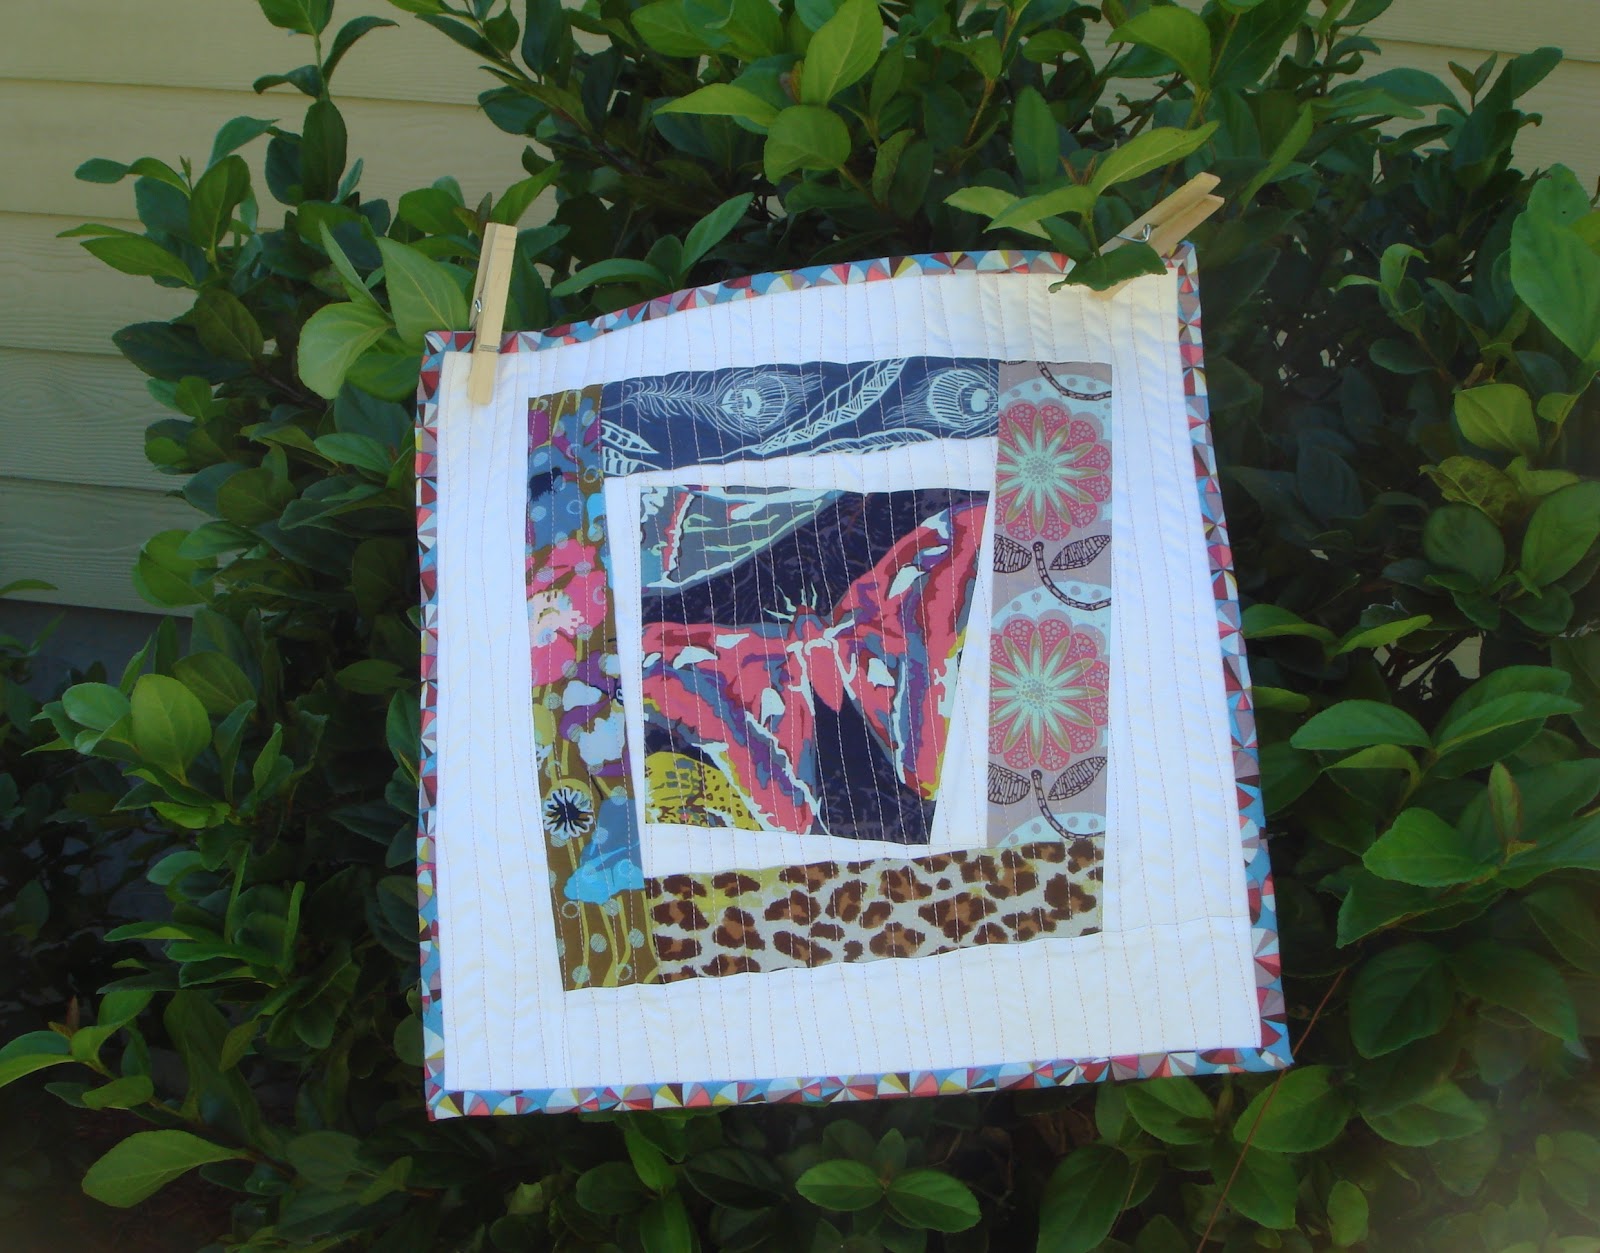
I made the baby peace quilt using Christmas scraps for a wall hanging.


I loved how quickly the top came together (I am all about instant gratification).  I loved how all my squares lined up so perfectly...a first for me ;-) The cutting instructions were spot on! I was able to lay out the strips on my dining room table and easily pieced the top in one afternoon.


The quilt was a perfect size for my Frustration and I to practice our FMQ.

The wall hanging goes perfectly in our kitchen, and we were able to enjoy this beauty during Christmas.


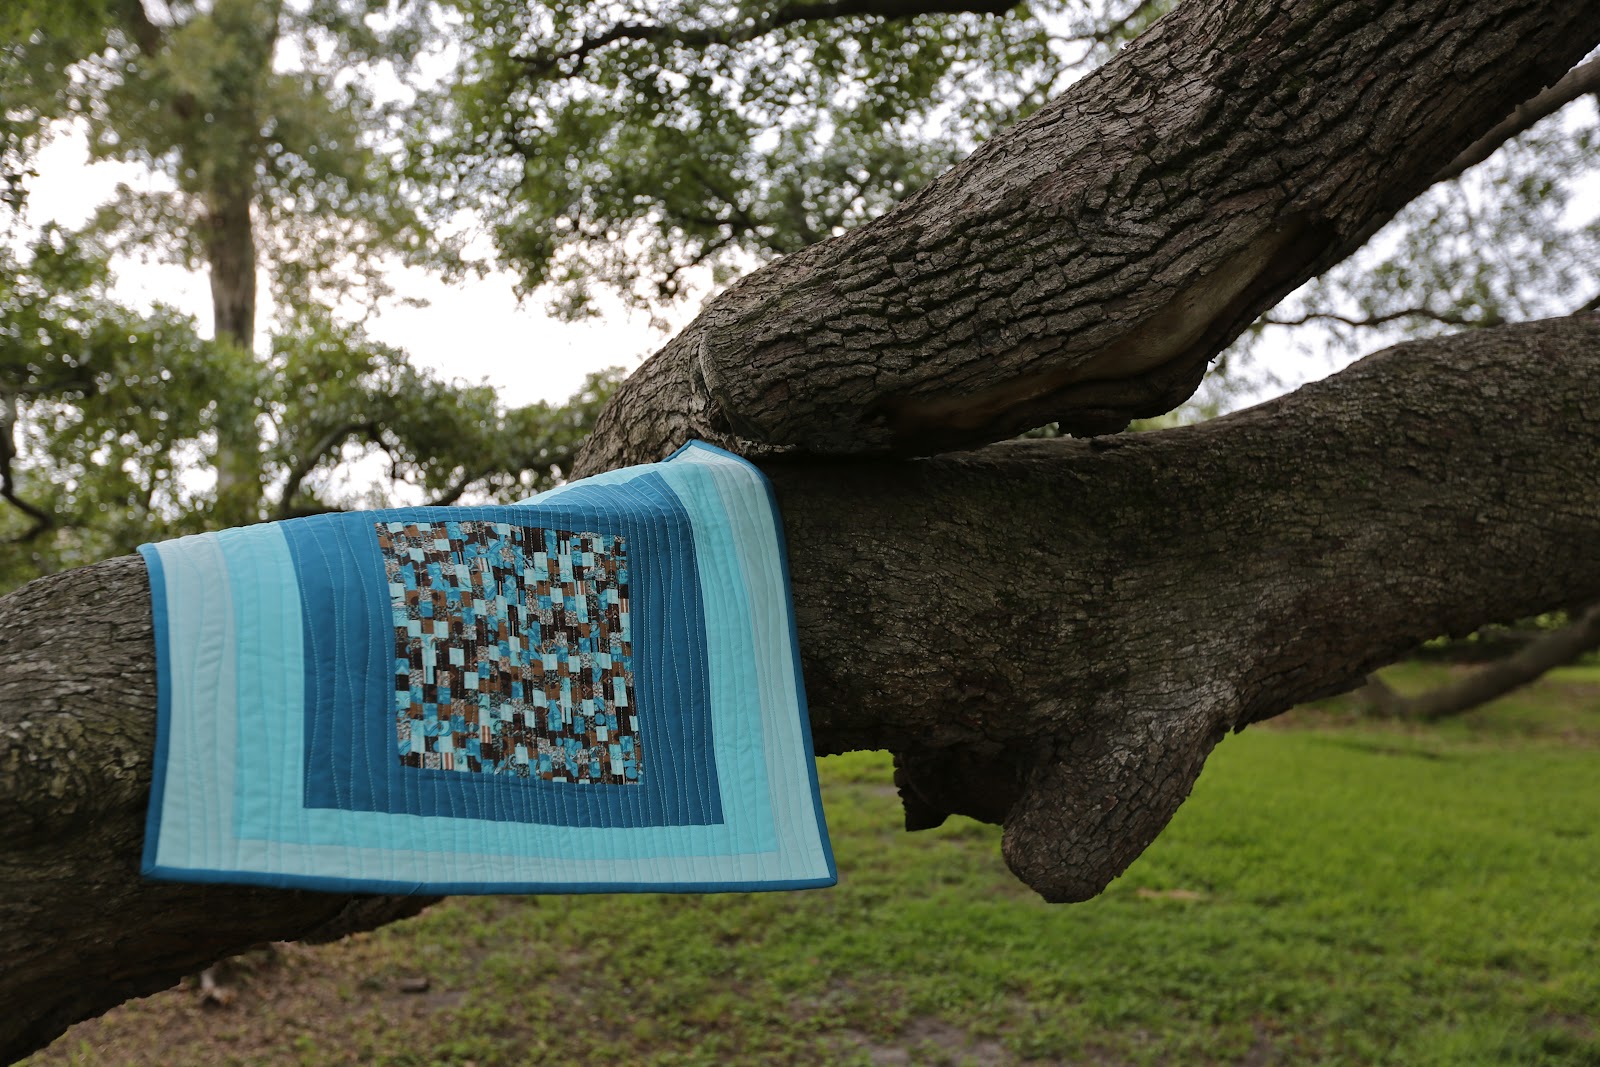
I have to say, however, that my second Peace quilt (the lap size) is my favorite. The squares are primarily Kaffe Fassett, with a few random squares thrown in. I waffled on the background fabric, finally choosing Kona Tangerine. As Rene' said, "Go bold or go home!" A perfect choice!!


As with the baby quilt, the instructions were perfect, and everything lined up nicely. Rene's pattern sure makes my quilting look good ;-)


Rene' included great graphics/diagrams for each size quilt. This really helped while laying out the strips and during piecing.


I am looking forward to finishing my Peace quilt, although I have no clue yet how I'm going to quilt it! Any suggestions would be greatly appreciated ;-)


Be sure and leave a comment for your chance to win the giveaway of this pattern. I will leave the giveaway open through February 1st.  And be sure to check out the other blogs for some beautiful eye candy and more chances to win.

Bloggy Party Schedule:

Monday, January 21 -  Katie at KT Quilts
Tuesday, January 22 - Michele at  Nostalgic Cafe
Wednesday, January 23 - Cindy at  Live a Colorful Life
Friday, January 25 - Stephanie at Peas in a Pod 
Monday, January 28 - Terri at Terri's Notebook 
Tuesday, January 29 - Doris at Made by a Brunnette 
Wednesday, January 30 - Mary at Mary on Lake Pulaski 
Thursday, January 31 - Shelly at Prairie Moon Quilts 
Friday, February 1 - back to Rene' Creates  for a give away
Thanks, as always, for visiting my blog!
~ Michelle ~

Monday, January 21, 2013

~ Family Secrets ~

Who would have known that while my sister and I were scheming a surprise birthday quilt for our mom that she had a little secret of her own?!? Christmas quilts for us both...


Although we knew our mom had taken a quilting class in October, we never imagined that she would be working on TWO quilts for Christmas.


I am totally blown away by this "beginner!" And I use that word lightly.


My quilt is absolutely gorgeous!! And perfect for nap taking ;-)


Somewhere under that bundle is me ;-)))
Mom named the quilt "Memories." We have such wonderful memories of past Christmases, and we are always looking forward to making more memories.


We have had so much fun the past few months sharing our quilting journey. We laughingly ask what we talked about before we quilted, as the three of us spend hours on the phone with quilty talk.


Be sure to drop by my sister's blog to see the beautiful quilt our mom made for her!!!

Thanks, as always, for visiting my blog!!

~ Michelle ~

Saturday, December 22, 2012

~ A Most Special Gift ~


Today is a most special day for a most special lady...my mother. Happy Birthday, Mom! My sister, Rene', believes strongly in celebrating all milestone birthdays (any birthday ending in a five or zero) in a BIG way. So to honor our mom's milestone birthday, we decided to make her a quilt...together. And I am so excited to finally be able to share it!!


 We started our planning this past summer during our Gruber's retreat. Even though I blamed gave credit to Rene' for coming up with the idea of a Great Granny Square quilt, it was our good friend Doris's idea (God bless her). It was a perfect choice!! After all, our mother recently became a Great Grandmother, but has also been a great grandmother and a great mother!!

We spent much time talking, planning, choosing the perfect fabric, stressing...

...for me, mainly stressing. So much, in fact, I was very careful to follow the directions
TO . A . T!!!
 In fact, the tutorial never left my side.


My Frustration was also nearby to ensure I did not miss a step.


As I completed each block, I would send a pic to Rene' through Instagram. Here are a couple of my blocks...


I must say, our IG friends were awesome in cheering us on during the making of this quilt...thank you!!

I played around with the layout of my blocks.

Not a great picture...my "design wall" is now located behind my bedroom door :(

I even labeled each block with a piece of painters tape so I wouldn't lose my place. As I have mentioned frequently, I am directionally challenged.


After sewing my two columns together, I shipped it to Rene' to finish piecing the top with her blocks. She then pieced the back, basted the quilt, and sent it back to me to be quilted. Yikes!!


My Frustration must have realized that I was a nervous wreck, seriously stressing, panic ridden really focused on the quilting, because he stayed as far away from me as he could that day (yes, I cranked this baby out in one day...not recommended).


We were able to get a couple of pictures of the two of us with the unfinished quilt when Rene' and her family made a quick stop over after an FSU game.


Rene' took care of the binding and a most wonderful photo shoot of the finished quilt.


Quilt Stats:
 finished size 58"x72
 pattern used: great granny square blocks
pieced by me and Rene', quilted by me
 fabric used Top: Kate Spain Serenade and Kona White, Backing: Rock n Romance by Pat Bravo (Rebel Cheri Whispers) , Binding: Kate Spain Fandango.
What a great time we had making this quilt!! I can't think of a better gift to give our mother, who has been such a big supporter of our quilting journey.
I can't wait to see the finished quilt in a few days...and to get a picture of the birthday girl with her birthday quilt!!

Be sure to check out Rene's blog and her post about our special quilty gift!

I'm linking up with AmandaJean and Sarah.

Happy Birthday, Mom!! We love you (most)!!!

~ Michelle ~
(whew)

Friday, November 23, 2012

~ Lots of Work, Little to Show ~

I've been very busy with quilty projects this week. So busy, in fact, that just about every muscle in my body aches. However, I don't have much to show for it...you know, 'Tis the Season to be working on Christmas gifts and such ;-) But here is what I can show...

I have begun my first scrappy quilt (barely) and I am SO excited!!!!!


This quilt is inspired by the Checkerboard quilt from Sunday Morning Quilts. Although I am piecing blocks instead of rows, as in Amanda Jean's pattern, I love how she combined whites and creams to go with her scraps.

I've been cutting and storing my scraps the past few weeks,

Putting my scrap basket from Cindy, Live a Colorful Life, to good use ;-)

and cutting and storing my whites and creams.


Love my bag from Michele, at Nostalgic Cafe :)

This quilt will be a long time in the making, so I hope I can remain patient and forgo my tendency toward instant gratification.

I've also been working on my FMQ skills. Typically, I do a meandering stitch, but I decided to try some loopy stitches.


I have to admit, I feel much more comfortable with the meandering stitch, but with practice, I'm sure I'll learn to love doing the loops.

Of course, my Frustration has enjoyed our quilting time as always...


Pretty pitiful showing considering the hours I've quilted this week ;-( Hopefully, I can show some completed projects soon!!

I hope everyone had a wonderful, restful Thanksgiving!!

~ Michelle ~


Sunday, October 28, 2012

Blogger's Quilt Festival ~ Fall 2012


I am so excited to participate in my second Blogger's Quilt Festival. Thank you, Amy,  for organizing this great event and thanks to all of the sponsors!
This year, I chose to enter a mini/wall quilt that I gifted to my sister, Rene',  for her birthday.


I enjoy making quilty gifts, but I find it stressful to make quilts for Rene'. She is, after all, the one who introduced me to quilting. I still ask her lots of questions while making quilts, so it's difficult not to rely on her input and advice while making gifts for her.

The pattern, Fiesta Wall Quilt, is from the book Quilting Modern, by Jaquie Gering and Katie Pedersen. Fortunately for me, they were very detailed with the instructions. And trust me, I went step by step with this one, not wanting to make a mess of it. The fabrics selected were:

Center block: Couture French Dress by Laura Berringer for Marcus Brothers Fabrics
Inner Border: Kona Teal Blue
Center Border: Kona Azure
Outer Border: Kona Aqua

This was the first time I used my design wall for something other than just a place to hang my blocks ;-)


As I am directionally challenged, I numbered each strip with painters tape so I wouldn't get turned around.


And of course, I kept the book opened on my table for quick (and frequent) checks to make sure I hadn't missed a step.


My Frustration and I were quite exhausted, but pleased, once completed.


This mini quilt spent time in Georgia, Florida, Minnesota, Washington, Mississippi, and then back to Florida where it now hangs in my sister's house. Here are a few shots that were taken during its travels...


Blogger's Quilt Festival Stats:
Finished Quilt Measures 24 x 24
Quilted with organic lines by me using my home machine
Best Category: Favorite Mini Quilt, Favorite Wall Hanging
Edited to add: Festival Number:358
Thanks, as always, for visiting my blog!
~ Michelle ~

Sunday, October 14, 2012

Pay Back

Any believers in karma out there? Or maybe just payback? Well, I got a little taste of both recently. As many of you know, I have a really awesome big sister. So awesome, in fact, that she loves me even after the angst of our childhood years. By angst, I mean that I was an absolute booger to her. I was the tortuous younger sister who would start fights, then sit back and watch smugly as she got blamed by our parents. Sweet, right?


I'm the smarty pants on the left pointing to the chalkboard.
 
 My mother used to say that I was spoiled, but not spoiled rotten.

Spoiled? Yes
Rotten? You betcha'

  What does this have to do with quilting? Well, I think Rene' got a wee bit of quilty revenge.

I've been a little bummed lately because I don't have time to work on any major project. Rene' has always encouraged me to try smaller projects like mini quilts or random blocks. One block suggested was the Great Granny Square. Isn't she sweet? Anyone who knows me (and my sister knows me WELL), knows the following:

1. I don't like working with small pieces (by small I mean less than 5 inches...haha).
2. I stress over my accuracy in piecing and matching seams.
3. I am directionally challenged.

Anyone familiar with the Great Granny Square must already see where I am going with this!!

I began my block by laying out my printed squares in seven rows as suggested in this tutorial. So far, so good. Then I added my 12 white background squares on the ends of each row. Huh? Something wasn't right. I was short two white squares. I counted the 12 squares, recounted them, counted the number of row ends, recounted them. UGH! Then I called Rene' ;-)


Our conversation went something like this:
Me: "My squares aren't adding up (Insert a panicked voice) !!! What am I doing WRONG (Insert slightly whiny voice)??"
Rene': "Did you read all the directions before you started?" (insert laughter)
Me: "Uh, why would I do that?"
Rene': "Well, it would probably help with this block."

I turn the page...


Notice the words "excluding" (in CAPS!!!!!) the middle row.

So, after reading ALL of the directions, my layout was much better.


I pieced the blocks in each row and carefully carried them to my kitchen, uh, ironing station.


My two must have tools...coffee and Best Press

Well, the directions read to "press your rows with the seam allowance going opposite directions (oh, crap...I have to remember the direction when pressing the rows?????). I'm sweating at this point and wishing my beverage of choice was not coffee!!! Meanwhile, I'm imagining my sister laughing hysterically!!! I press my first row to the right. No problem, that's how I usually press. Therefore, the next row needed to be pressed to the left. Hmmm...not used to that direction (kind of like writing with my left hand), but others do it, I guess I can. I start cussing and wondering why this was so dang hard!! I swear it took me forever to realize I could just turn  the row around and press it to the right. DUH!!! Now, I'm sure, Rene' is on the floor laughing her butt off, picturing my stupidity. She's probably crying at this point from the laughter!!

Sewing the rows together was relatively pain free, and my resulting block didn't turn out too badly!


My first block set "on point."

I think the next time Rene' suggests a smallish project I should question her motives. SERIOUSLY!!
 I mean really...
41 little bitty pieces (okay, not that small) and 24 connecting seams to match...for ONE block???
Two and a half hours later???
And making another Great Granny Square block? Well, let me just say that it would take some SERIOUS arm twisting!!!!!

Thanks, as always, for visiting my blog!!

~ Michelle ~

Friday, October 12, 2012

Chasing Butterflies For A Friend

I spent a beautiful afternoon chasing a butterfly, trying to get that perfect shot of this mini I made for a friend. The sun did not want to cooperate, and the shadows wanted to play with us, but boy did I have fun!


 This mini was made for a swap with my Gruber's retreat friends. I drew Terri's name, and it didn't take long for me to decide the fabric I wanted to use.


Terri is a huge fan of Anna Maria Horner, and I knew she was anxiously awaiting the arrival of her new line, Field Study. So while I began waiting for the arrival as well, I started brainstorming on what to make.


Once I received my Field Study order, I realized that the ideas I had come up with just would not work. So, back to the designing board.


Field Study has beautiful, large prints, and initially I did not want to cut it! Seriously... I really did not want to cut it...it almost pained me to cut it!! I think I even heard a little groaning from the cutting mat.


But I know a quilt cannot be made without a little cutting. So cutting I did...alot...too much. It took me awhile to finally decide on what I wanted to make, but hopefully Terri will be able to use the scraps (big and small) that I included with her mini quilt. 


I wanted it to showcase the beauty of the prints. I fussy cut a butterfly (Terri loves butterflies!!) and surrounded it with some wonky log cabin strips. The quilt top, backing and binding is all from the Field Study collection with a little Kona White added to help bring out the beautiful colors.


I quilted this mini using organic lines (my favorite) using a pale pink thread.


I hope I did Field Study justice, and that Terri loves the mini as much as I came to love it!!

Thanks, as always, for visiting my blog!!
~ Michelle ~